:: Home
:: About Us
:: Products We Service
:: Our Rates
:: Manufacturers Serviced
:: Alesis Customers
:: ADAT Repair Rates
:: ADAT Manual Cleaning
:: Contact
:: Check Repair Status
ML9600 Masterlink 40GB HD Update
MasterLink ML9600 Removable Drive
  // Professional Audio, Video, and Data Equipment Services //


:: High Quality :: Reasonable Rates :: Most Manufacturers :: Nationwide Service

:: ADAT Manual Cleaning Procedure

Manual Cleaning Procedure

Cleaning Materials

For the tape path

Lint free cotton buds.

DO NOT USE THIS COTTON BUD TO CLEAN THE ROTARY HEAD SYSTEM.

99.9% pure Isoproplyl Alcohol - available from your local pharmacy.

For the rotary head system.

Lint-free cloth.

99.9% pure Isopropyl Alcohol.

or

CQ video head cleaning sachet.

The sachet contains a lint free pad already dampened with the correct cleaning solutions.

WARNING!

Before proceeding, Remove The Mains Power And Other Connections To The Machine
FAILURE TO UNPLUG THE UNIT FROM THE MAINS SUPPLY BEFORE OPENING MAY CAUSE ELECTRICAL SHOCK.
Place the ADAT facing forwards on a clear surface, remove the top cover.

Tape Path Description.

The tape is taken from the left supply hub and travels past a stationary guide, the tension arm, P1 fixed guide, impedance roller and then P2 inclined and roller guide. From there it enters the rotating head system. On exiting from the rotating heads the tape passes around P3 inclined and roller guide across the linear head and P4 fixed guide and from there through the capstan shaft/pinch roller and onto the take up hub.

Note that the inclined and roller guides will be located at the front of the rotary head system in the unlaced or disengaged position.

Cleaning The Tape Path.

All parts that come into contact with the tape should be cleaned. Refer to the drawing as an aid to identification.

Adopt a logical approach following the path of the tape from the left of the transport towards the right. This will ensure nothing is missed.

Use a cotton swab dipped in alcohol and adopting a sideways (horizontal), rather than an up and downward motion, clean the following components:

On the left, entrance side of the transport, in order:

• Tension arm post.

• P2 Inclined post and roller guide.

• Fixed post - not shown.

• P1 Stationary guide and impedance roller.

On the exit side, in order:

• The linear head.

• P4 fixed guide.

• Capstan shaft.

• P3 inclined post and roller guide

Make sure the white roller guide sleeves are cleaned thoroughly by rotating them.

To aid identification:

• Guides incorporate a channel in which the tape runs.

• Posts have a constant diameter with no channel.

The linear head, which resembles a conventional analogue head, can be cleaned with a swab, again using side to side strokes.

The capstan shaft can be cleaned with alcohol.

Do not clean the pinch roller as the alcohol will cause the rubber to become hard and crack over a period of time. Unless you have specialist rubber cleaner, leave the pinch roller cleaning until its next service.

Make sure any excess moisture is removed after cleaning.

Rotary Head Description.

There are two main parts to this, the lower drum, which is stationary and secured to the chassis and the rotating upper drum or "scanner" which houses the two read and two write heads. The scanner rotates in an anti clockwise direction at high speed. The heads themselves are located at the bottom of the scanner in recesses. Their alignment is critical and should not be disturbed under any circumstances. If the condition of the head has deteriorated to the point where an ERR 7is displayed, the use of a cleaning tape may well not be enough to clear the problem.

Cleaning the Rotary Head

THE HEADS ARE EXTREMELY DELICATE AND HAVE BEEN PRECISELY ALIGNED DURING MANUFACTURE. ALTHOUGH THE OPERATION IS STRAIGHTFORWARD, IT IS VERY IMPORTANT TO EXERCISE CAUTION WHEN HEAD CLEANING AND TO PROCEED CAREFULLY AND METHODICALLY.

IF YOU HAVE ANY DOUBTS DO NOT PROCEED. CAUTIONS: WHEN CLEANING THE ROTARY HEADS.

• Do not use any material other than lint free cloth (CQ sachet) for cleaning the rotary head.
• Do not move cloth while holding it against the head.
• Do not use upward, downward or sideways motions.

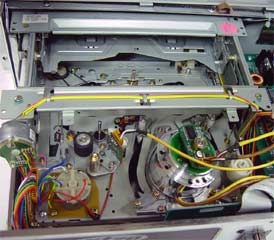
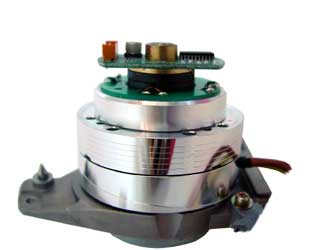
To clean the heads open the CQ sachet, which already contains the necessary cloth and cleaning agents. Leaving the cloth folded, place it against the drum (the easiest place is on the right-hand side of the drum) and hold it gently in place with your index finger. While applying GENTLE pressure to the drum rotate the upper half or scanner ANTI-CLOCKWISE 20 times, using the round rotor board that is secured to its top.

(We repeat, it is very important that you do not move the cloth or your finger while you are rotating the scanner as this can damage or affect the alignment of the heads.)

This has the effect of swiping the heads through the material and the cleaners, which dissolve out the embedded oxide and debris, depositing them onto the cloth. The result is a dark smear on the material. Continue cleaning until no more residues appear on the cloth, do not let the cloth dry out.

The helical groove around the top of the lower drum should also be cleaned. As this does not spin a cotton swab moistened with alcohol will suffice. As you clean this groove, rotate the upper drum a little to keep the heads away from the swab.

Do not allow the cotton swab to come into contact with the heads.

Wait for two or three minutes to allow the alcohol to evaporate before inserting a tape, failure to do this will result in a tape tangle.

Test the recorder while the mechanism is still exposed to be sure that the tape plays satisfactorily and that none of the indicators described in the first section of these instructions is present.

Having completed the head and tape path cleaning and tested that the recorder is operating correctly, replace and secure the top plate or cover of the ADAT, return the recorder to its normal position and reconnect the mains power, audio and control cables.


.......................

home | about us | products we service | rates | links